[Debian 10] ufw を使ったファイアウォールの設定
前書き
ConoHa VPS 上で稼働させている Debian にファイアウォールの設定をする。ConoHa VPS の管理画面のファイアウォールは柔軟性が低いので自分でファイアウォールを構築することにした。
どういうことかというと、

上記「接続許可ポート」のところを見ると、予め決められたポート番号しか制御できないことがわかる。
たとえば tcp 12345 を許可したい、といった場合にその設定ができないことになる。柔軟性が低いというのはそういう意味です。さくらインターネットの VPS だとこんなことはなかったので ConohaVPS は使いにくいっす。
で、僕はどうするかというと、上記「接続許可ポート」のところを 全て許可 にして、自分で Debian にファイアウォール設定をやっていこうというわけです。これをやるのに ufw を使います。
順序的にはまず ufw でファイアウオール設定を済ませます。その後、「接続許可ポート」のところで 全て許可 にだけチェックを入れます。
過去記事を参考に ufw を設定する
これまで Ubuntu, Linux Lite, ラズパイで ufw を設定してきた過去記事 がありますので、自分でそれを参考にしながらやっていきます。
その前に ufw をインストールする
$ aptitude show ufw
Warning: Invalid locale (please review locale settings, this might lead to problems later):
  locale::facet::_S_create_c_locale name not valid
Package: ufw
Version: 0.36-1
State: not installed
Priority: optional
Section: admin
Maintainer: Jamie Strandboge jamie@ubuntu.com
Architecture: all
Uncompressed Size: 852 k
Depends: iptables, lsb-base (>= 3.0-6), ucf, python3:any, debconf (>= 0.5) | debconf-2.0
Suggests: rsyslog
Description: program for managing a Netfilter firewall
 The Uncomplicated FireWall is a front-end for iptables, to make managing a Netfilter firewall easier. It
 provides a command line interface with syntax similar to OpenBSD's Packet Filter. It is particularly
 well-suited as a host-based firewall.
Homepage: https://launchpad.net/ufw
Tags: admin::configuring, implemented-in::python, interface::commandline, network::firewall, role::program,
      scope::utility, security::firewall
$
↑ Debian に ufw がインストールされていなかったので ufw をインストールします。
$ sudo apt-get install ufw
「手順 1」ufw で許可したい通信を日本語で箇条書きにする
- ssh アクセスを許可する
- ssh のレートリミットを設定する
- tcp 7876 へのアクセスを許可する
- tcp 27876 へのアクセスを許可する
- tcp 7874 へのアクセスを許可する
- tcp 27874 へのアクセスを許可する
「手順2」手順1を元にして ufw の設定コマンドを作る
sudo ufw default deny incoming
sudo ufw allow in on eth0 to ww.xx.yy.zz port ssh
sudo ufw limit ssh
sudo ufw limit ssh comment 'Rate Limit for SSH Server'
sudo ufw allow in on eth0 to ww.xx.yy.zz port 7876 proto tcp
sudo ufw allow in on eth0 to ww.xx.yy.zz port 27876 proto tcp
sudo ufw allow in on eth0 to ww.xx.yy.zz port 7874 proto tcp
sudo ufw allow in on eth0 to ww.xx.yy.zz port 27874 proto tcp
sudo ufw logging on
sudo ufw logging medium
「手順3」手順2で作った ufw のコマンドを投入する
$ sudo ufw default deny incoming
Default incoming policy changed to 'deny'
(be sure to update your rules accordingly)
$ sudo ufw allow in on eth0 to ww.xx.yy.zz port ssh
Rules updated
$ sudo ufw limit ssh
Rules updated
Rules updated (v6)
$ sudo ufw limit ssh comment 'Rate Limit for SSH Server'
Rules updated
Rules updated (v6)
$ sudo ufw allow in on eth0 to ww.xx.yy.zz port 7876 proto tcp
Rules updated
$ sudo ufw allow in on eth0 to ww.xx.yy.zz port 27876 proto tcp
Rules updated
$ sudo ufw allow in on eth0 to ww.xx.yy.zz port 7874 proto tcp
Rules updated
$ sudo ufw allow in on eth0 to ww.xx.yy.zz port 27874 proto tcp
Rules updated
$ sudo ufw logging on
Logging enabled
$ sudo ufw logging medium
Logging enabled
$
「手順4」IPv6 を無効にする
これ、ufw をインストールした後の手順1としてやるべきでしたが忘れていました。
$ cd /etc/default/
$ sudo cp -p ufw ufw.org
$ ls -l ufw*
-rw-r--r-- 1 root root 1788 Jul 9 13:06 ufw
-rw-r--r-- 1 root root 1788 Jul 9 13:06 ufw.org
$ sudo vi ufw
IPV6=yes の行を IPV6=no に変更します。diff で編集箇所を確認すると、
$ diff ufw.org ufw
7c7
< IPV6=yes
---
> IPV6=no
$
「手順5」ufw を起動する
$ sudo ufw status
Status: inactive
$ sudo ufw enable
Command may disrupt existing ssh connections. Proceed with operation (y|n)? y
Firewall is active and enabled on system startup
$ sudo ufw status numbered
Status: active

     To                         Action     From
     --                         ------     ----
[ 1] ww.xx.yy.zz 22/tcp on eth0 ALLOW IN   Anywhere
[ 2] 22/tcp                     LIMIT IN   Anywhere   # Rate Limit for SSH Server
[ 3] ww.xx.yy.zz 7876/tcp on eth0 ALLOW IN   Anywhere
[ 4] ww.xx.yy.zz 27876/tcp on eth0 ALLOW IN   Anywhere
[ 5] ww.xx.yy.zz 7874/tcp on eth0 ALLOW IN   Anywhere
[ 6] ww.xx.yy.zz 27874/tcp on eth0 ALLOW IN   Anywhere
$
ConoHa VPS のファイアウォールを「全て許可」にする
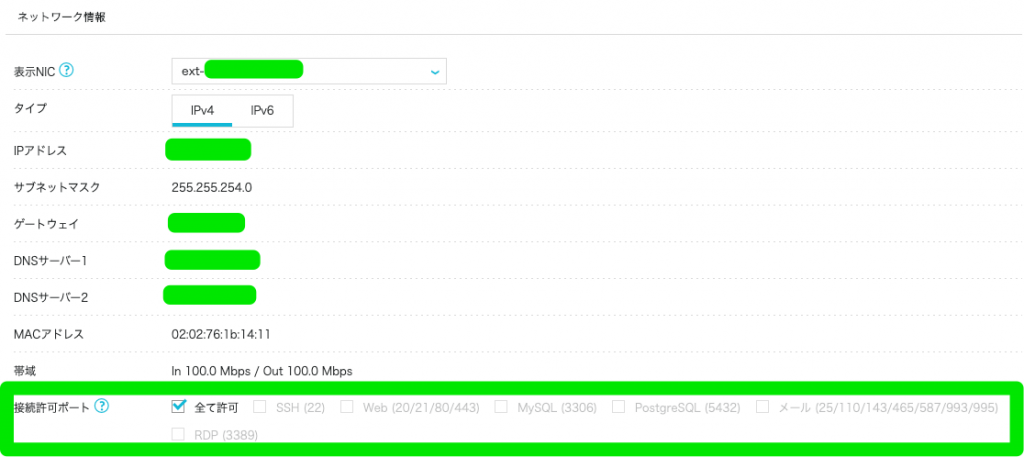
全て許可 だけにチェックがついた状態にした。